Like many others, I've bought an Aluminium Keyboard for its cool
style the smooth typing experience it provides. Mine is a wired
version, ISO variant (international, 110-keys). It's not working 100%
out-of-the-box under Linux, so this post explains what I did to make it
happen:
-
Supporting the additional keys (F13..F19) and geometry (physical layout) under X.org
-
Making the keyboard auto-configured at X.org startup. No need to mess with xorg.conf!
But wait, there's more. If you're accustomed to PC keyboards, you really need those ones too:
-
Making this fn key located on top of the delete key behave like a regular PC keyboard: Insert!
-
Making multimedia keys output Fxx symbols by default
-
Making F13..F15 behave like those charmingly obsolete Scroll Lock..Print Screen keys
-
Keeping the multimedia keys accessible when the fn key is remapped to Insert
Prerequisite
First, make sure you have installed all the packages below and that their versions are recent enough:
- xserver-xorg v1.5.2, X.org's hotplug-aware X server
- xserver-xorg-input-evdev v2.0.xx, evdev driver for input devices
- HAL v0.5.xx, the hardware abstraction layer daemon which gives hotplug information to the X server
How the support works
Install
Go grab this patch and save it in your home directory; it contains the relevant XKB updates to support the keymap and the geometry of Apple Aluminium keyboard, ISO variant. It also defines two XKB options to make this keyboard behave more like a PC keyboard (more on that later). To install it, first pretend to apply the patch in the directory that holds the XKB data. On my Ubuntu, this gives:
sudo bash
cd /usr/share/X11/xkb
gunzip -cd $HOME/xkb-apple-aluminium-kdb-iso.patch.gz | patch -p1 --dry-run
If the patch applies successfuly, you can proceed and apply it for real:
gunzip -cd $HOME/xkb-apple-aluminium-kdb-iso.patch.gz | patch -p1
Once you have the relevant XKB definition for your keyboard, you need to tell X.org to apply these settings automatically when it detects your keyboard. The following HAL fdi file makes the necessary voodoo (read: XKB settings) for you. Note that these settings do not preclude your system-wide XKB options.
In order to install the fdi file I'm providing, just copy it in the HAL
directory which holds user-defined policies for devices. On my Ubuntu,
this directory is /usr/share/hal/fdi/policy/30user. You might need to
create 30user if it doesn't exist.
Test
Now that you installed everything, restart HAL. For example, on a Debian-like distro:
sudo /etc/init.d/hal restart
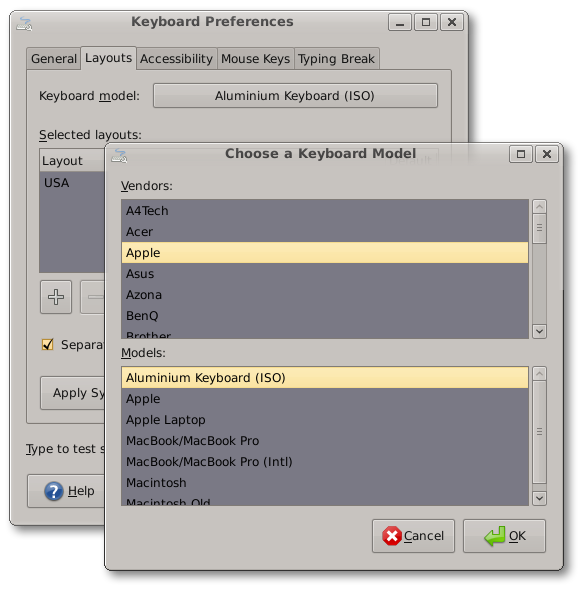
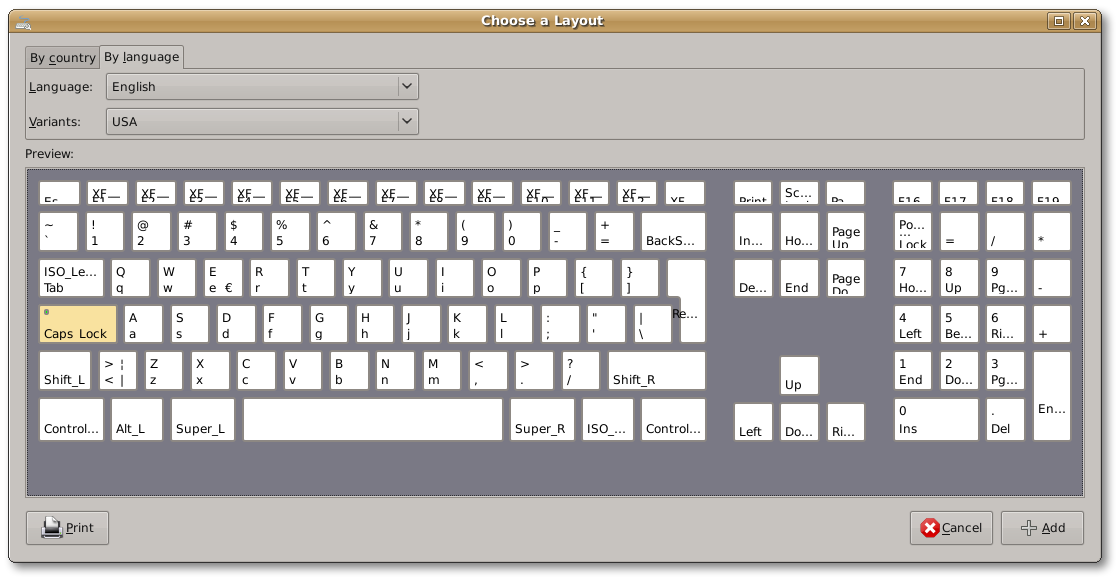
Then log out from your current X session and start a new one. If everything went well, you should now be able to see the Aluminium Keyboard in your keyboard preferences application. The screenshots below show the result under GNOME:
Make it a PC keyboard!
The Insert key hack
The fn key is not seen by X because its keycode (464) is greater than 255, which is not allowed in X11 protocol. But there is a trick: under Linux, you can modify the kernel scancode→keycode mapping of your evdev device!
Just uncomment the two optional lines in the fdi file I'm providing to make the fn scancode (HID usage 0xff0003 on this keyboard) generate the Insert keycode (110) in userland and make Xorg happy :D
For curious people: Initially (funny how these names look familiar if you read p.g.o...), HAL's keycode remapping seems to have been designed with AT scancodes in mind, not HID usages. In order to override those ones, you must revert a special encoding performed for representing AT escape scancodes. In our case, you end up remapping usage 0xffdf83!
Fxx keys enabled by default
This one is not new. In order to boot with Fxx keys enabled, you must
pass an option to the hid Linux module. On my Ubuntu, this can be done
by updating modprobe options and rebuilding an initrd image.
sudo bash
echo "options hid pb_fnmode=2" >> /etc/modprobe.d/alukbd
echo "options hid_apple fnmode=2" >> /etc/modprobe.d/alukbd
update-initramfs -k `uname -r` -u
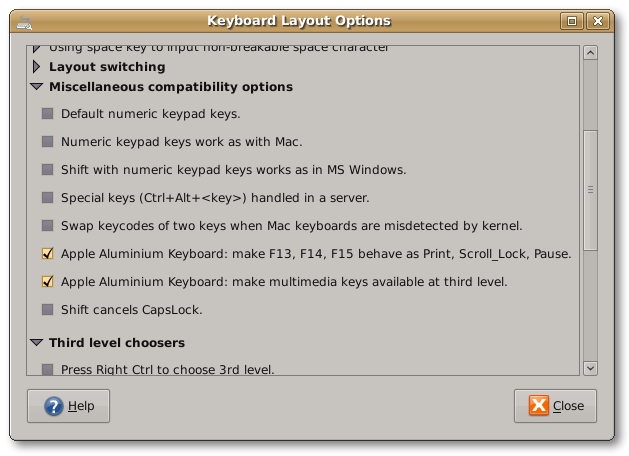
Additional PC-like XKB options
The XKB patch I'm providing defines two new XKB options:
apple:alupcfkeys- If you need to map F13..F15 to Scroll Lock..Print Screen keys (I won't judge you, I swear :P)
apple:alul3media- If you remap fn to Insert, this options allows you to access the
multimedia keys is by typing 3rd-level chooser + Fxx key. I've
mapped my 3rd-level chooser to the right Alt key (XKB option
lv3:ralt_switch)
Naturally, the simplest way of using these XKB options is to enable them via your keyboard preferences application. For instance, GNOME users can find them in the Keyboard Layout Options:
Conclusion
My XKB and HAL settings provide complete support for your Aluminium Keyboard on Xorg Linux. However, the Insert key hack is probably not mainstream and ultimately should not land in a fdi file. It would be better to make a distro package such as “enable PC-support on Aluminium Keyboard”.
The XKB geometry implemented is for the ISO variant. if you have one of the other variant and like to throw it away, you know I'd be happy to add support for it, eheh :P
References
| [1] | http://www.freedesktop.org/wiki/Software/Xserver |
| [2] | http://cgit.freedesktop.org/xorg/driver/xf86-input-evdev |
| [3] | http://www.freedesktop.org/wiki/Software/hal |
| [4] | http://thread.gmane.org/gmane.comp.freedesktop.hal/8615/focus=8615 |
| [5] | http://planet.gnome.org/ |